Drink Styling: How to Style Drinks for Photography
Jun 17, 2026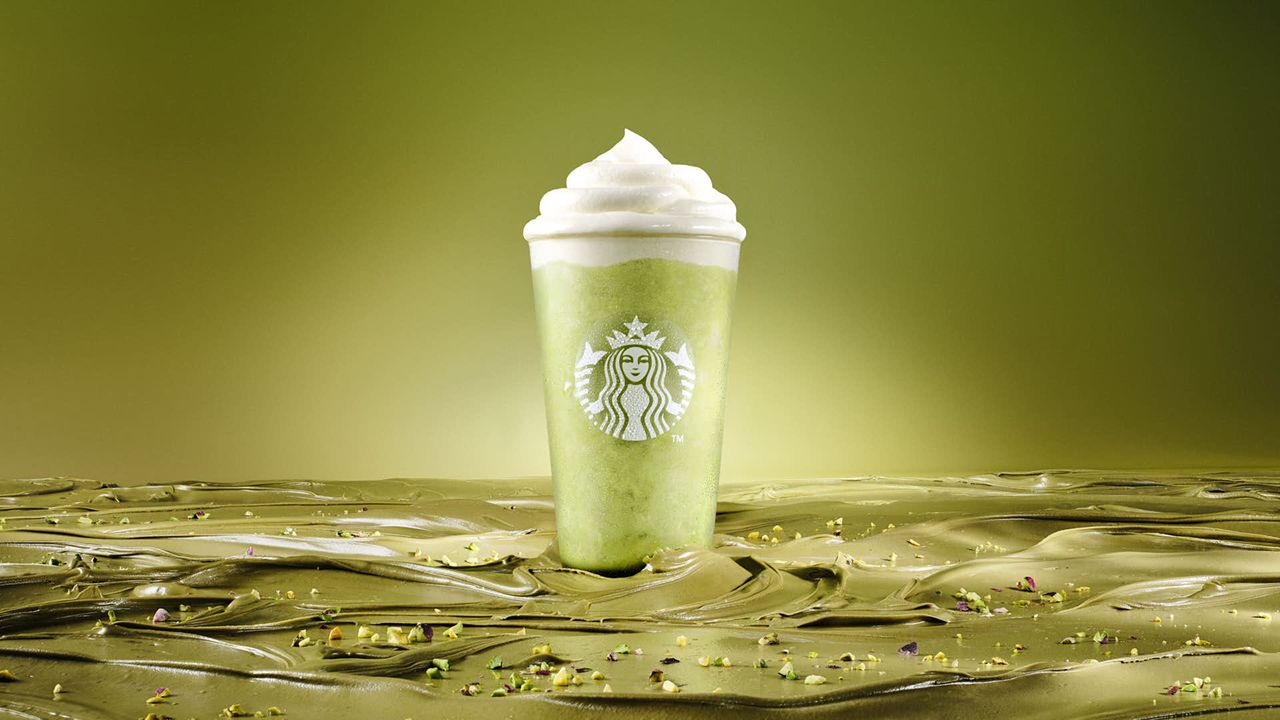
Drink styling is one of the most underrated skills in commercial image-making. Most people assume that pouring a cocktail and pressing the shutter is enough — until they actually try it. The ice clouds over, the foam collapses, the bubbles vanish, the garnish wilts, and the glass goes flat and lifeless on camera within seconds.
Styling drinks is its own discipline. It overlaps with food styling, but liquids behave differently under studio lights, and the techniques that make a beverage look irresistible are very specific. This guide walks through what drink styling is, the tools you need, how to handle every major category of drink, and the small details — ice, condensation, bubbles, garnishes and pours — that separate amateur shots from professional, ad-worthy results.
What Is Drink Styling?
Drink styling (also called beverage styling) is the craft of preparing, building and maintaining drinks so they look their absolute best on camera. A drink stylist controls everything the lens sees: the clarity of the liquid, the shape and placement of ice, the level of condensation on the glass, the size and persistence of bubbles, the garnish, and the way light passes through the glass.
The goal is the same as in food styling — create a visual that communicates a feeling and a brand message — but the medium is far less forgiving. A plate of food can hold its look for several minutes. A cold drink can lose its appeal in under a minute as ice melts and condensation runs. That time pressure is exactly why drink styling is a specialized, high-value skill.
Why Drink Styling Is Harder Than It Looks
Liquids and glassware introduce problems that solid food never does:
- Time sensitivity. Foam on beer or coffee can collapse in 30 seconds under hot lights. Ice melts and clouds the liquid.
- Transparency. The camera sees straight through the glass, so fingerprints, dust, bubbles clinging to the inside, and uneven liquid levels are all painfully visible.
- Reflections. Glass and shiny liquid bounce the entire studio back at the lens, including the photographer, lights and ceiling.
- Condensation control. Too little looks dry and warm; too much looks sloppy. It also runs and pools quickly.
- Carbonation. Bubbles in soft drinks, sparkling wine and beer are gorgeous for seconds, then gone.
Because of all this, professional drink stylists rely on preparation, the right materials, and repeatable techniques rather than luck.
Essential Drink Styling Tools
Most of a drink stylist’s kit overlaps with a general food styling kit — if you are still building yours, start with our food styling tools checklist. For drinks specifically, the essentials include:
- Acrylic (fake) ice cubes for long setups, plus real ice for hero details.
- Spray bottles — one with plain water, one with a glycerin/water mix for long-lasting condensation.
- Glycerin for controlled, droplet-style condensation that holds at room temperature.
- Pipettes and syringes for placing precise droplets and adjusting liquid levels.
- Fine table salt to revive and rebuild beer foam.
- Tweezers and bent-tip tools for placing garnishes, bubbles and rims.
- Funnels and small jugs for clean, controlled pours.
- Lint-free cloths and cotton swabs for cleaning glass and wiping drips.
- Backup glassware — always have multiples, polished and dust-free.
How to Style Different Types of Drinks
Each category of drink has its own personality and its own technical traps. Here is how professionals approach the most common ones.
Cocktails
Cocktails are about color, clarity and a hero garnish. Build the drink with the clearest liquid possible, fill the glass with ice so the level stays high as it “melts,” and reserve your freshest, most photogenic garnish for the final hero shot. Citrus twists, edible flowers, herbs and a clean rim do most of the storytelling. Wipe the outside of the glass spotless before adding any styled condensation.
Beer
Beer is all about the head. A fresh pour produces beautiful foam that lasts only seconds under lights, so stylists rebuild it: a small, evenly sprinkled pinch of fine table salt revives a flat head and brings the bubbles back up. For long commercial setups, many professionals use “stunt foam” — a soap-and-salt mixture that mimics beer foam but holds far longer. Backlighting the glass makes the liquid glow golden and shows off the bubble structure.
Coffee and Hot Drinks
For coffee, crema and visible steam sell the warmth. To rebuild surface bubbles that pop too fast, pour a little coffee into a cup, add a drop of dish soap, stir vigorously, then spoon the bubbles onto your hero drink. Steam can be real (a freshly microwaved drink) or faked with a warmed, damp cotton ball hidden behind the cup — a classic trick that reads as natural on camera.
Carbonated and Soft Drinks
Fizzy drinks live and die by their bubbles. Shoot fast, and use side or back lighting to catch the carbonation. To prolong bubbles, some stylists add a tiny amount of an acid or salt to trigger fresh effervescence right before the shot. Acrylic ice keeps the glass clear because it never melts or clouds.
Wine and Spirits
Wine and spirits are about color and clarity. The liquid itself is the hero, so the glass must be flawless — no fingerprints, no dust, no clinging bubbles. Control the pour level precisely (a pipette helps), and use lighting that lets the color glow rather than going muddy.
Juices and Smoothies
Thick, opaque drinks hide ice and props, so texture and garnish do the work: a dusting of seeds, a fresh fruit slice, or a visible layer. Because they separate and dull quickly, build them last and shoot promptly.
Mastering the Details
The difference between a snapshot and a commercial image lives in these four details.
Ice: Real vs Acrylic
Real ice looks perfect for the first 60 seconds, then clouds and melts. Acrylic ice never melts, stays crystal clear, and lets you work for hours — ideal for long setups and re-shoots. The trade-off: acrylic ice doesn’t produce its own condensation, so you add that effect yourself (see below). A common pro approach is to build the glass with acrylic ice and drop in one piece of real ice for the hero frame.
Condensation
For quick, natural condensation, lightly mist a chilled glass with plain water right before shooting. For condensation that lasts for hours under lights, mix glycerin and water roughly 50/50 in a spray bottle and apply — the glycerin slows evaporation so the droplets hold. Spray from a distance for a fine, even mist, or use a pipette to place larger hero droplets exactly where you want them.
Bubbles and Carbonation
Freeze bubbles in motion with a fast shutter or high-speed flash. To add bubbles on demand, the dish-soap-and-stir trick (described above for coffee) works for any surface foam, and a pinch of salt re-energizes carbonation. Place individual hero bubbles with a pipette if you need precise control.
Garnishes and Pours
Garnishes should look effortless but be deliberate — keep them fresh, dry and subtle so they support the drink rather than crowd it. Action shots (a sugar cube dropping, a citrus twist falling, a stream of liquid pouring) add energy; capture them with fast shutter speeds and plan the catch and clean-up in advance, because pours are messy and rarely perfect on the first try.
Lighting Drinks
Lighting is where drinks come alive. Because liquid is translucent, the most effective technique is backlighting (also called transmission lighting): placing a light behind or to the side of the glass so it shines through the liquid. This makes the drink glow from within, highlights condensation, and reveals the structure of bubbles and ice. Front lighting, by contrast, tends to make drinks look flat and dull. Diffusing the light softens harsh reflections on the glass.
An Honest Note on “Fake” Drinks
You will read about extreme tricks — motor oil, glue, soap. Some are real techniques used for non-consumable hero shots where the product will never be tasted. But modern, professional styling leans heavily on real product and craft, partly because advertising standards in many markets require ads to represent the actual product, and partly because clients increasingly want authenticity. Knowing both the “trick” and the “real” approach — and when each is appropriate — is part of being a professional. We cover the wider topic in our guide to food styling tricks the pros really use.
Common Drink Styling Mistakes
- Letting real ice melt and cloud the liquid before the hero shot.
- Over-spraying condensation until it runs and pools.
- Dirty or fingerprinted glass that the camera magnifies.
- Front lighting that kills the glow and the bubbles.
- Overcrowding with garnish instead of choosing one clean hero element.
- Not having backup glassware and product ready for re-shoots.
How to Learn Drink Styling
Drink styling rewards hands-on practice. Start by recreating a single drink — a cocktail, a coffee or a beer — and shoot it ten different ways, changing one variable at a time: ice, condensation, garnish, lighting. You will learn more from that exercise than from hours of reading.
To shorten the learning curve, structured training helps you skip the trial-and-error stage. The Food & Drink Styling course library teaches the styling techniques that keep drinks looking fresh on set, from foundational skills in the Beginner Food Styling Course through to commercial-level work in the Premium Food Styling Program. If you are weighing styling against photography as a focus, our comparison of a food styling course vs a photography course is a useful starting point.
Frequently Asked Questions
What is the difference between drink styling and food styling?
Drink styling focuses on liquids and glassware — ice, condensation, bubbles, clarity and reflections — which are far more time-sensitive than solid food. Food styling has more working time; drinks often look their best for under a minute, so technique and preparation matter even more.
How do you keep ice from melting during a drink shoot?
Professionals use clear acrylic ice cubes, which never melt or cloud the liquid, then add real ice only for the final hero frame if needed. Acrylic ice also lets you re-shoot for hours without rebuilding the drink.
How do you create condensation on a glass for photos?
For a quick, natural look, mist a chilled glass with plain water just before shooting. For condensation that holds under hot lights, spray a roughly 50/50 mix of glycerin and water, or place individual droplets with a pipette.
How do you keep beer foam from disappearing?
Sprinkle a small, even pinch of fine table salt to revive a flat head, or use “stunt foam” (a soap-and-salt mixture) for long setups. Backlighting makes the foam and bubbles read beautifully.
Do you need to be a photographer to style drinks?
No, but understanding lighting, angles and how glass reads on camera makes you far more effective. Many stylists learn photography fundamentals alongside styling for exactly this reason.
Final Thoughts
Drink styling looks effortless in the final image and is anything but behind the scenes. The craft lives in the details — clear ice, controlled condensation, lively bubbles, a single perfect garnish and light that glows through the glass. Master those, work quickly and methodically, and practice with real drinks, and you will produce beverage images that look every bit as polished as the ones in national campaigns.
If you want a guided path, explore the Food & Drink Styling courses and start building drink projects for your portfolio today.