Step-by-Step Food Styling: 19 Steps to Award Images
Jun 17, 2026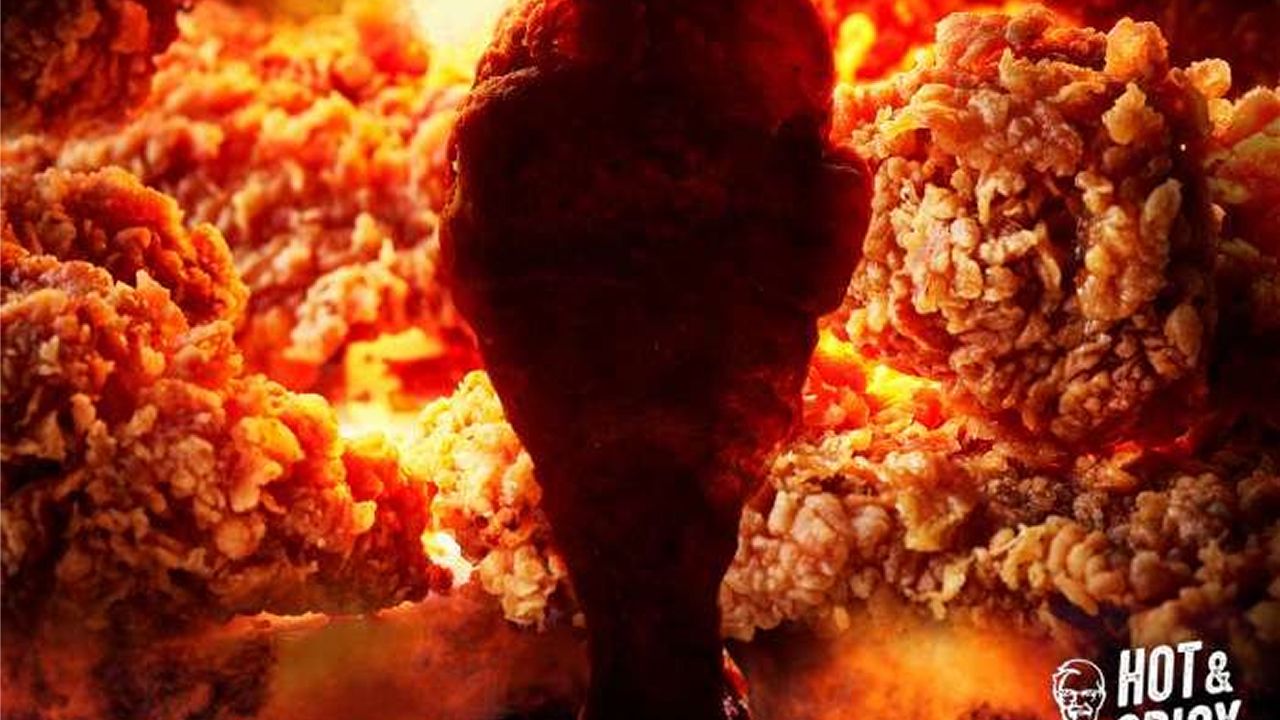
Award-winning food images rarely happen by accident. Behind almost every shot that wins a competition or anchors a national campaign is a deliberate, repeatable process — a sequence of decisions made long before the shutter ever clicks.
I know this because the 19 images in this guide are the exact shots that built my portfolio and put my name in front of brands like McDonald’s, Coca-Cola, KFC, Magnum, Domino’s, Baileys and Deliveroo. Each one was awarded or nominated at competitions such as the Pink Lady Food Photographer of the Year, the International Color Awards and the Tokyo International Photo Awards. What they have in common is not luck — it is a workflow.
This is that workflow, broken into 19 clear steps across four phases: planning, building the food, working on set, and finishing. Follow them in order and you will style with the same intention professionals use to create images good enough to win — not just images that look “nice.” Throughout, I’ll point to the real awarded images where each technique earned its place.
What Makes a Food Image “Award-Winning”?
Before the steps, it helps to know what judges and art directors actually respond to. Award-winning food images almost always share four qualities. Every step below exists to serve one of them.
Plan Before You Touch Any Food
Most styling problems are actually planning problems — the strongest stylists do most of their thinking before the kitchen gets busy.
Decide what the image is supposed to say before anything else. Comforting and rustic? Fresh and clean? Bold and commercial? A single, clear concept guides every later decision about food, props, color and light. Without it, you are just arranging objects.
Collect 5–10 reference images that match the mood you are after. Studying awarded work and commercial campaigns trains your visual instincts and gives you a concrete target to style toward, rather than guessing on set.
Identify the single hero element — the dish or drink the whole frame serves. Everything else exists to make that hero look its best, never to compete with it. In my poke bowl, every cube of salmon, mango and avocado was cut and placed to frame one reading of “fresh”; nothing was there by accident.
On professional sets, composition, prop styling and surfaces are usually led by an art director or prop stylist — but you should still plan a cohesive color palette and a surface that supports the concept. Limit the palette; harmony reads as intentional, clutter reads as amateur. (For where the stylist’s role ends and others begin, see our guide on food styling vs food photography.)

Buy multiples of every key ingredient — often three to five times what you think you need. You will discard most of it. For the steak above, the most important step happened before any cooking: going to the butcher in person to select hero pieces with similar shapes, so one could be the main cut and another could supply the slices. Award-level results come from selecting the single best berry, the most perfect bun, the cleanest scoop from many options.
Lay out your tools before you start. Across these 19 images, the kit that did the real work included tweezers, brushes and pipettes, spray bottles for a glycerin-water mix, a blowtorch and an industrial heat gun, cotton swabs and offset spatulas, T-pins and wooden skewers for structure, a Lekue piping nozzle for sauces, superglue for placing crumbs and curls, and an ozo jug for pouring drinks without splashes. If you are still assembling yours, work from our food styling tools checklist so nothing stops you mid-shot.
Build the Food for the Camera
Food cooked to eat often photographs worse than food cooked for the lens. This is where technical craft does the heavy lifting.
Undercook or par-cook to preserve color and structure. The steak was brought to exactly 54°C for a medium-rare look (60°C for medium); the poke bowl rice was pulled while still firm so it held its shape; the linguine came out a couple of minutes early so it stayed hard enough to style; and the rhubarb galette baked only ten minutes, because any longer and the rhubarb loses color and wrinkles. A blowtorch or heat gun then adds realistic color exactly where the camera needs it.

From all your backups, choose the one piece with the best shape, color and surface, then perfect it. For the KFC shot, that meant superglueing individual crumbs and flakes onto the coating wherever it looked thin — a process that can take a couple of hours to make the chicken read as craveable. Trim, turn and position the hero so its most photogenic side faces the lens. This single choice often makes or breaks the image.
Great food images feel generous and dimensional, and that look is engineered. The BLT was held together with T-pins and a long wooden stick. The pancake stack was separated by hidden cardboard disks to create height, with fresh fruit opening up the gaps. For the rhubarb galette, a small bowl was placed upside-down inside the custard so the tart sat proud instead of sinking. Angle each component so the camera reads volume, not a flat, squashed plate.

Food dulls and dries under lights, so keep it looking just-made. Sausages get the perfect skin by pouring boiling water over them, drying with a heat gun, then a light coating of browning. Pickled onion slivers go into vinegar until they turn the right pink. Avocado is brushed with lemon juice and ascorbic acid to hold its color. Elsewhere a little oil or a glycerin-water mist adds a natural sheen. Subtlety is everything — greasy or over-wet reads as fake.

Apply sauces at the final moment, deliberately. The chocolate over the pancakes was poured live, with the camera rolling; the caramel and the milk-and-white chocolate swirls were dragged into S-shapes with a clean spatula; the BLT mayo went on through a Lekue piping nozzle for control; and the raspberry coulis was mixed with jam in equal parts to thicken it so it held its shape instead of running off. For more of these methods, see our breakdown of food styling tricks the pros really use.

One perfect, fresh garnish beats a scatter of distractions. On the salmon bagel, the dill was reset as many times as it took so it looked fresh with a beautiful natural curl at the moment of capture, and the pepper was ground straight over the dish for a natural spread. Place garnishes precisely with tweezers, keep them dry and vibrant, and make sure each one supports the story rather than crowding the hero.
On Set — Style to the Camera
Styling and shooting are a conversation. The frame should drive your styling choices, not the other way around.
Decide the angle — overhead, three-quarter or straight-on — before final styling, because each angle hides and reveals different things. Style to what the lens actually sees, not to how the plate looks from above while you work.
Light is where images win or lose. Use soft, directional light — often from the side or behind — to reveal texture, create depth and build mood. The KFC pieces were arranged specifically to let light fall through them; the coffee and espresso shots rely on backlight to make the surface glow. Flat, frontal light kills dimension.

Steam, melting ice, collapsing foam and wilting herbs all have a countdown, so stage them last and have a plan. For drinks I use polished hand-made acrylic ice that never clouds or melts, a glycerin-water spray for permanent condensation, and an ozo jug to pour without splashes. The coffee coupe was poured on set so the marbling formed live; the gin & tonic got its spritz from a pinch of idrolitina at the moment of the shot.

Whenever possible, shoot connected to a screen so you can see the real frame at full size. Problems invisible to the naked eye — a stray crumb, an awkward shadow, a dull edge — jump out instantly on the monitor.
Award-level images are built frame by frame. Make one small change — nudge a garnish, add a droplet, lift a layer — then reshoot and compare. This iterative loop, not a single perfect setup, is how professionals close the gap to outstanding.
Finish and Curate
Before the final frames, wipe plate edges, remove stray crumbs, and clean any drips with cotton swabs. The camera magnifies every smudge, and clean execution is one of the clearest signals of professional work.
Select only your strongest frame, retouch with a light hand (enhance, never fake what a brand must deliver), and add it to your portfolio with intention. The 19 images in this guide are exactly that — a small, curated body of work that did more for my career than any large folder of average shots ever could. Quality of curation is part of the craft.
The 19 Award-Winning Images
Every image below was styled with the process above, and every one was awarded or nominated. Here is the full set, with the studio credit and the recognition each one earned.
Steak
Hero cuts hand-picked at the butcher, cooked to 54°C, sliced with a filleting knife and brushed to revive dry edges.

The Cheese Pull
Hand-torn bread for rough edges, layered cheddar and mozzarella, pulled the instant it left the pan.
Salmon Bagel
Quick-pickled onions, salmon folded on set to catch light, dill reset until perfectly fresh.

Chocolate Swirls
Milk chocolate dropped in an S over white, then blended with a clean spatula into a marble.

Sausage Pan
Skins blistered with boiling water, dried with a heat gun, coated with browning, built with gravy and herbs.

Meringue
A Swiss meringue whipped firm; the whisk’s natural peak became the foreground hero.

BLT Sandwich
Bacon curled over an oven rack, layers pinned with T-pins and a hidden stick, mayo piped, veg misted.

Pigs in Blankets
Hero bacon cooked separately and grafted onto a hero sausage; canned-cherry sauce piped last.
KFC
Coating perfected for hours with superglued crumbs, arranged to let light pass through, finished with oil.

Poke Bowl
Slightly undercooked wild rice for shape, big uneven cubes of salmon and mango, avocado held with lemon and ascorbic acid.

Rhubarb Galette
Rhubarb cut to identical sizes and baked just ten minutes; an upside-down bowl floats the tart on swirled custard.

Coffee Coupe
A spotless coupe filled 80% on set, then topped from a jug to create the marbling live in the glass.
Espresso
Backlit crema with localized steam from a chemical reaction, or real steam composited for wider plumes.

Pasta Fork
Linguine pulled early so it holds shape, curled on the fork with a little superglue, brushed with peppered oil.

Waffles
Berries glossed in reserved cherry syrup, whipped Philadelphia smoothed, one waffle broken for an indulgent look.
Caramel
Warmed gently to avoid bubbles, then poured and captured live as the spatula sweeps S-shapes through it.

Rum
Glass polished against the light, lower half matt- and glycerin-sprayed, acrylic ice, poured with an ozo jug.
Gin & Tonic
Hand-curled lime, acrylic ice and garnishes set between them, with idrolitina for a live spritz.
Pancakes
Even shapes from a small pan, lifted on hidden cardboard disks, thick raspberry mix tucked between, chocolate poured on camera.
Common Mistakes That Keep Images From Winning
- Styling without a concept, so the image has no point of view.
- Cooking food fully when undercooking would photograph better.
- Over-styling until the frame feels fussy and artificial.
- Flat, frontal lighting that flattens texture and mood.
- Adding sauce or garnish too early so it dulls before the shot.
- Skipping backups, leaving no perfect hero to choose from.
- Not reviewing on a screen and missing crumbs, drips and dull edges.
How to Learn This Process Properly
Reading the steps is easy; developing the judgment to apply them is what takes practice. The fastest path is structured training combined with consistent personal projects where you run this full workflow end to end.
The Food & Drink Styling course library teaches this process with real demonstrations — from foundations in the Beginner Food Styling Course and core technique in the Fundamentals Food Styling Course, through to commercial and award-level work in the Advanced Food Styling Course and the Premium Food Styling Program. If you are just starting out, our food styling for beginners guide is a gentler on-ramp.
Frequently Asked Questions
What is the first step in food styling?
How do food stylists make food look so perfect on camera?
Do you need expensive equipment to create award-winning food images?
How long does it take to style one award-level image?
What is the difference between food styling and food photography?
Learn the Full Process Hands-On
These 19 images were built with one repeatable workflow. Explore the Food & Drink Styling courses and start building your next award-level image this week.
Explore the CoursesAward-winning food images are the product of a process, not a moment of luck. Plan with a clear concept, build the food for the camera, style to the frame under intentional light, then finish and curate with discipline.